Level 1 Challenge
If you’ve been following my class homework submissions, you know how much I’m loving this program! It has stretched my creativity to new heights, taught me new techniques, and often moved me out of my crafting comfort zone. While I’ve used primarily AlteNew products, I’ve also used other supplies on hand. The challenge is no exception - at once fun and difficult, there’s a big feeling of accomplishment at the end.
Here’s what’s required:
So, what three components from the classes did I use? To be honest, I used many more than just three! But the three I focused on the most were:
1. Easy Layering Techniques. AlteNew is well known for its layered stamp sets that add dimension and color to (mainly floral) images. It is such fun to ink up and line up the different layers and watch the magic happen! Using masking I learned how to make some images appear in front of or behind others. Because there were more floral elements in the feminine cards, this technique is more evident in that set.
2 Easy Die Cutting Techniques. Early in my crafting journey I learned about die cutting. Early on, it was mostly about using different colored card-stock to cut out shapes and letters and assembling them together. However, with AlteNew and this class, it goes to a whole new level! Die cuts that coordinate precisely with stamped images allow for scene building, backgrounds, inlays and dimension. It’s a whole new ball game! You will see this technique in both the masculine and feminine cards.
3. Irresistible Inking Techniques. Once you get started with stamping it’s just a hop, skip and a jump to using your inks in many different ways! There is the inking directly to paper technique, ink blending, using inks as watercolors, “smooshing” ink onto paper for a background, spattering, and using inks through stencils to name just a few! These techniques are evident on both sets of cards.
THE CARDS
Masculine Cards
Thinking that they’d be more difficult, I decided to start with cards for the guys. We had a whole class devoted to this and I really used some of the core ideas. For their cohesive elements, these cards would feature angles, geometric shapes, a palette of blues, blacks, browns and beiges. In my stash, I had some burlap paper which I was itching to use as well and it appears on three of the cards and the gift box.
Another idea I had for these cards was to use a unique gatefold angled card base that reminds me of a man’s shirt. A video of my process appears a little later in this post. You will also see that this is where I used recycled items! The scraps from creating the angles became the triangles that I embossed for the guy’s birthday card.


Men’s Angled Gatefold Card base Instruction Video
A Closer Look: Masculine Cards

Supplies Used:
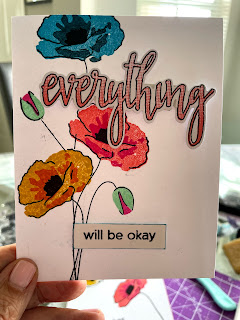
- Neenah solar white 80 lb card stock
- AlteNew Everything stamp and die set
-AlteNew Playful Patterns background stencil
-DCWV Natural Burlap paper
Ranger archival ink by Wendy Vecchi Sky Blue and Peat Moss. Ranger Distress Ink in Pumice Stone.
- Velcro dots
Technique
-Create card base as shown in video.
- using ink blending brushes and desired colors, stencil background onto a piece of white 4” x 5” card stock.
-Stamp and die cut sentiments. Color the word “everything” in a color that coordinates with your stamp inks.
- cut burlap paper and stenciled card stock to shapes that match cover panels.
-assemble card using wet glue (I like Bearly Art Glue). This allows a little time to “wiggle” your components into just the rusher spots!
-Add Velcro dots for closure if desired.

Supplies Used:
-Neenah Solar White 80 lb card stock
-AlteNew Tufted Chair Outline Stamp Set
-Fun Stampers Journey Good Life Prints Designer Series Paper
-DCWV Natural Burlap Paper
-Versafine Onyx Black Pigment Ink
-Illustration Alcohol Ink Markers
Techniques
-Create angled gate fold card base as per video.
-Cut designer and burlap paper to fit the sides of the card.
-Stamp tufted chair outline and sentiment in the Versafine Onyx ink
-Color in the chair cushions and chair legs.
- Fussy cut chair image (no die cut 😞)
- Assemble card. I used a very thin black strip of card stock to demarcate the designer paper.
-mat the Just Chill sentiment on a square of burlap paper. Use dimensional dots to adhere the sentiment in such a way that it “catches” and secures the card as a closure.

Supplies Used:
-Neenah Solar White 80 lb card stock
-Fun Stampers Journey Designer Series Wood Grain and Map paper
-Glitter paper.
-AlteNew Celebrations Stamp and Die set.
-Watermark embossing ink and AlteNew antique gold embossing powder.
-Alcohol Ink Illustrator markers
-Sizzix “Happy Birthday” script sentiment.
-Velcro dots
Techniques
- Create card base as per video
- Stamp and heat emboss outlines for birthday gift boxes and vase. Color in with markers, and die cut the elements to be used.
- Die cut the words, “Happy Birthday” from blue glitter paper, adhere to white cardstock which you will cut to match the angles of the card.
-Assemble card with a Velcro closure.

This card uses recycled elements….all the triangles are the waste pieces from cutting the angled card bases (see video).
Supplies Used:
-Neenah Solar White 80 lb card stock
-Fun Stampers Journey Wood Grain Designer Series Paper
-Watermark Embossing Ink. AlteNew Embossing Powder in Antique Gold and Antique Silver. Wow Embossing Powder in Sparkle.
-AlteNew “birthday wishes” sentiment.
Techniques:
-Saturate each shape with embossing ink and heat embossed in the different colors. Here’s a short video demonstration:


Continuing with the burlap for texture I also added a dry embossed black strip on the box cover. I used the same sentiment for both the masculine and feminine gift boxes.
Feminine Cards


Feminine Cards: A Closer Look
After all that burlap, wood grain, black, blue and hard edges, I was more than ready to embrace a palate of pinks, corals, soft greens and the light and floaty images of flowers, butterflies and playful patterns! By this time I had also acquired some AlteNew brand crisp dye inks to play with, and they did not disappoint!


Supplies Used:
-Neenah Solar White 80 lb cardstock cut to A2 size
-AlteNew Garden Harmony Dry Embossing Folder
-AlteNew Painted Butterflies Stamp and Die Set
-DCWV Glitter Pastels Mat Stack in dark pink
-AlteNew Crisp Dye Ink in Baby Pink, Fuschia and Magenta, Limeade, Lime and Fresh Leaf
-Versafine Onyx Black Pigment Ink
- Foam tape
Techniques Used:
- Dry emboss a panel of 4 1/4” x 5 1/2” cardstock using the Garden Harmony Folder. Adhere to the card front.
- Outline stamp the largest butterfly and 4 smaller butterflies using black pigment ink
- use stamp layers to add color to your butterflies and then die cut them.
-using foam tape to pop them up, adhere the butterflies to the card front.
- add the stamped, “Thank You” sentiment matted on the pink glitter pastel paper.


-Neenah Solar White 80 lb cardstock
-AlteNew Build a Flower: Cara Louise Peony Stamp and Die Set
-AlteNew Crisp Dye Inks in Baby Pink, Fuschia, Magenta, lime and Fresh Leaf
-DCWV Pastel Glitter paper in Pink.
Techniques used:
- stamp outlines in black and use colors with the layering stamps to create three large flowers and three sets of leaves.
- Die cut flowers and leaves and arrange on card from
- stamp the “Just for you on your birthday” sentiment in black from this set, mat on pink glitter paper and assemble card.


Here’s a slight departure into Coral colors from the pink.
Supplies Used:
-AlteNew Lush Garden Stamp and Stencil Set
- Edging from Lawn Fawn Watercolor Wishes patterned paper. Here’s another recycled element! These strips are usually thrown away!
Techniques Used:
-Stamp outlines and line up stencils to color the flowers and leaves.
-Fussy cut, strand and adhere flowers and leaves.
-Used a brush dipped in diluted ink to spatter the background.
- Add sentiment and striped (recycled) borders.


AlteNew Playful Patterns stenciled in pinks, green with blue dots for accents complete the set of feminine cards with a sentiment from my stash accented with metallic dots. The supples and techniques are listed previously in this post and so won’t be repeated here. On to the Feminine Gift Box
Feminine Gift Box


The shape, size and sentiment are the same as the masculine box. Of course, the difference here is the pink glitter vs burlap and roses vs black embossed panel.

I will close by showing the feminine and masculine gift boxed sets side by side, and say that I thoroughly enjoyed this challenge and look forward to the next steps in the journey to full AlteNew Educator Certification!

These cards rock! All of your hard work paid off. Love the burlap for a rugged masculine card!
ReplyDeleteMindy! These cards are fabulous!! You have out done yourself. I esp like the way you created your unusual card base for the masculine cards and the way they closed. The mixed media cards and the colours you used are wonderful! Thank you so much for submitting your work to the AECP assignment gallery.
ReplyDeleteThank you, Erum. Your opinion means so much to me!
DeleteWow these cards are gorgeous! Do you have an Etsy shop?
ReplyDeleteThanks, Jonathan! Yes, you can find my shop at wwwmindyscardsandgifts.Etsy.com
DeleteCorrect link for my Etsy shop is www.mindyscardsandgifts.Etsy.com
DeleteWow these are beautiful. I love the little details from the burlap to the stencils. Can't wait to see more. Do you make stationery too? Will definitely be purchasing from the Etsy store!
ReplyDeleteThank you, Avi! Yes I make stationary and anything you see in the shop can be customized!
DeleteThank you for sharing your beautiful work! These would make great gifts as a set. I will definitely by checking back to see what else you design!
ReplyDeleteThank you, Joanna! There’s more to see in my Etsy shop. Find me at www.mindyscardsandgifts.Etsy.com
DeleteThese are amazing Mindy! I do love the use of burlap, great idea and very manly!
ReplyDelete