Posts

Another November Challenge Card

Image
 Another entry! I still had some of my metallic dry embossed cardstock left and I thought it would look dramatic against a black background.   A small square made a nice vase for some autumn leaves carrying a “Hello” and “Hugs.”  Sequins add a bit of bling to this fun greeting.

AlteNew November Inspiration Challenge

Image
 After a long hiatus from crafting, during which I moved, took up Pickleball in a BIG way, and tended to family matters, I’m back at the crafting table.  This challenge really inspired me with its gorgeous autumn hues to create a Thank You card (Thanksgiving is approaching after all!) Here’s the link to the inspiration challenge:   https://blog.altenew.com/november-2022-inspiration-challenge-fall-card/ And here’s the card that I created: My pictures show the AlteNew ink colors I used.  They were:  Sunkissed, Mountain Mist, Rouge, Ocean Waves and Mango Smoothie.  I used AlteNew’s mini ink blending brushes to do the ink blending  The flower and leaves, stamped over the ink blended background in Versafine Onyx Black, are from the AlteNew Sparkle Bright stamp set, and the sentiment is from AlteNew’s Bloom and Grow Stamp set.  The border is a dry embossed panel that had been painted with bronze (from my stash).  I loved how that color and leaves married the theme of the card! Feels great to

AECP Level 2

Image
Having passed the Level 1 Challenge, I proudly moved on to Level 2 of the AlteNew Educator Certification Program. The first class, Beautiful Details, focused on innovative ways to combine inks, colored pencils and markers to bring unique variations to stamped images.  Stamped images can look very smooth and standard when used as intended.  By adding sketched lines and shadows, and/or using alcohol markers rather than stamp pads to add color to the stamps, an artist can add his or her own personality and interpretation to the images.  Although these techniques are time consuming, the result is very individual and unique. For this card, I used the middle layer of one of the flowers in AlteNew’s Lush Garden set.  I never would have thought to use alcohol markers to apply color before stamping, but that was what we were taught.  I just love the flow-y painterly result!!  I used Illustrator Alcohol Ink brush tip markers in Canary, cyan and sea breeze.  I then used AlteNew’s Woodless colored

Level 1 Challenge

Image
 Well the big day has finally arrived!  Ready to submit my cards and gift boxes for the AlteNew Educator Certification Program Level 1 Challenge!  I must pass this challenge to move on to Level 2. If you’ve been following my class homework submissions, you know how much I’m loving this program!  It has stretched my creativity to new heights, taught me new techniques, and often moved me out of my crafting comfort zone. While I’ve used primarily AlteNew products, I’ve also used other supplies on hand.  The challenge is no exception - at once fun and difficult, there’s a big feeling of accomplishment at the end.   Here’s what’s required: 1. Select any 3 components from the classes in Level 1 2. Create two sets of cards, a "His" and a "Hers", to include coordinating gift packaging. 3. Cards need to be a cohesive set for various occasions 4. Incorporate a recycled element, either on the cards or packaging.  So, what three components from the classes did I use?  To be hon

Set the Scene: final Level 1 submission

Image
 So excited to have Reached this point!  My final submissions for Level 1 of the AlteNew Educator Certification Program. I loved the idea of creating a scene behind a window.  Only one problem: I don’t have a window die!  I decided to make my own by cutting a 2.5 x 3.5 inch rectangle out of some black cardstock and then adding a quarter inch border all around which created a frame.  To create panes, I just used eighth inch strips across as shown. For the scene, I used AlteNew’s celebration stamps and dies - the tiered plate of macarons along with presents, a candle and a rose.  I hoped to create the illusions of looking into a festive party scene.  I used the sentiment “Congratulations” from the same set. I really had fun with the next scene because the stamps were “freebies” I had received from AlteNew.  The floral teacup stamp did not come with a coordinating die, so I fussy cut it out to make it a floor plant next to the armchair.  Using alcohol ink markers I colored in the elements

Let it Shine! AlteNew Educator submissions

Image
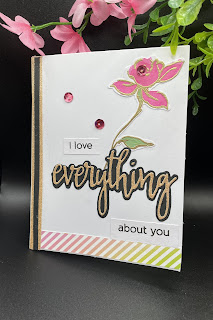
 If you like bling, sparkle and shine, this is the blog post for you! For my first card, I wanted to tell someone “I love everything about you” in a big way! So I die cut the large word “everything” from gold glitter paper and matted it on a black shadow to make it pop.  I had previously heat embossed the outline of a flower from the Golden Garden stamp set in gold (what else?) and painted it with pickled raspberry ink using the technique learned in the last class. I also die cut the flower.  The rest of the sentiment was stamped on white cardstock.  Now all that was left was to assemble the card. Knowing that a little glitter goes a long way, I added a thin strip on the right side of the card front near the fold, and added an even thinner strip of black down the middle of the glitter strip.  This resonates nicely with the black and glitter word which is the focal point of the card.  I added another strip of striped paper to the bottom to pick up the pink of the flower.  Following the

Irresistible Inking Techniques

Image
 I loved so many things about this class, but mostly I loved trying things I had never done before! For the first card, I heat embossed a large flower outline in gold on ecru colored cardstock.  Then I used my inks as watercolors!  I have a glass craft mat so it was simply a matter of stamping color on it, spritzing with water and then paining in the petals.  The embossed lines act as barriers to the ink.  I used my distress inks in spiced marmalade, mustard seed, and pickled raspberry for the flower.  To add the leaves, I made a mask for the flower so it looks like the leaves are behind it.  I decided not to heat emboss the leaf outlines since the flower is the star of the show.  Leaf color is cracked pistachio with a splash of mustard seed.  Gotta love those color names! When the painting was dry, I cut the paper to 5.25 x 4 inches.  I stamped the sentiment (which came from the same Hero Arts/AlteNew collaboration as the flower) directly on the panel.  Using the direct to paper inkin